January 29, 2026
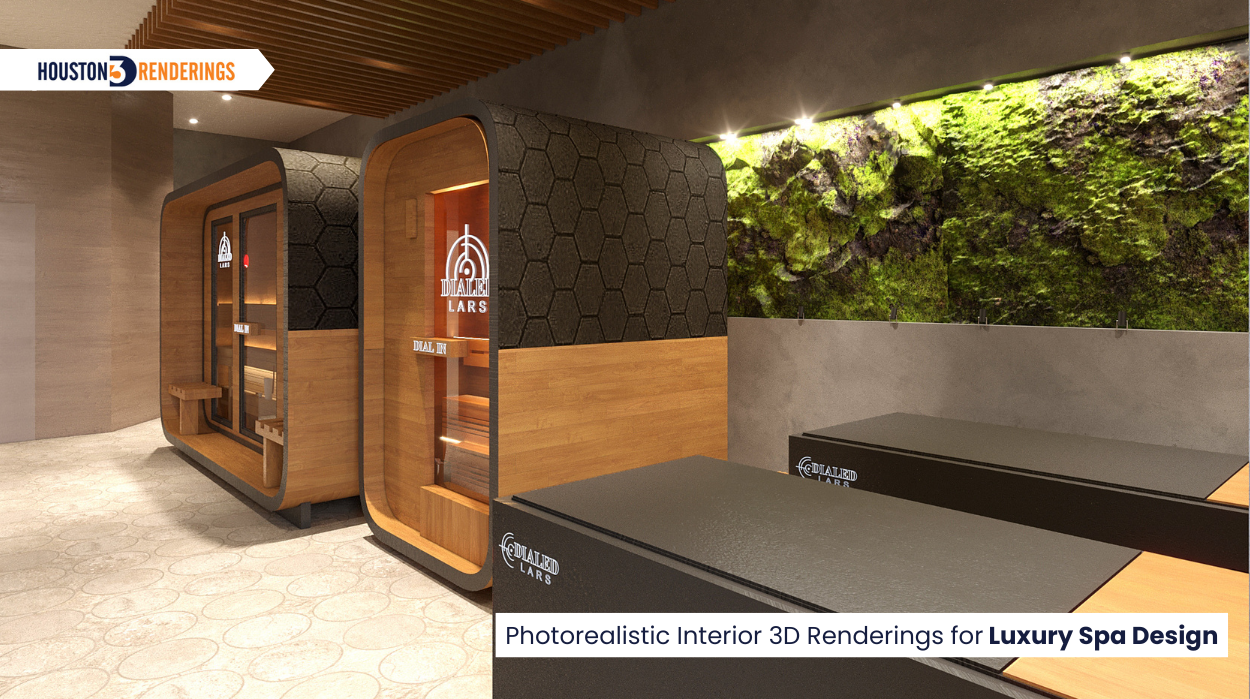
Communicating a detailed interior vision is often one of the biggest challenges in the design process, especially when multiple materials, finishes, and spatial elements must work together seamlessly. For this spa interior project, Tracey Freeman was developing a series of highly specialized interior spaces, including a sauna room, wet room, and machine room, along with a curated lobby space each requiring careful coordination of textures, finishes, and compositions.
While the design intent was clear, translating those ideas through traditional explanations alone proved difficult. With complex material combinations and precise view angles in play, it became essential to visualize how flooring, wall finishes, and ceiling elements would interact within the space. Clear, realistic imagery was needed to ensure both the designer’s vision and the client’s expectations were fully aligned before moving forward.
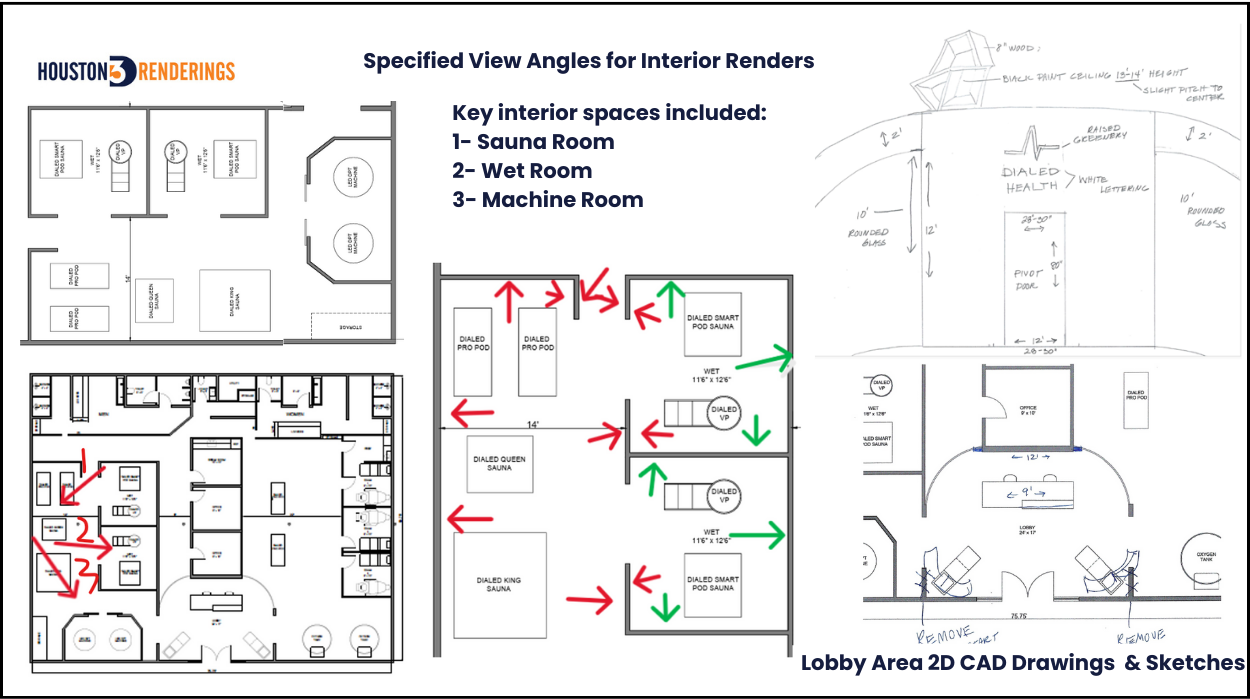
Design development initially relied on 2D CAD plans, which outlined layout and dimensions but lacked visual depth. Communicating materials, finishes, lighting, and spatial flow across specialized spa environments proved challenging through drawings alone. The requirement was clear: create photorealistic interior 3D renderings aligned with precisely marked view angles.
Key interior spaces included:
As a continuation of the overall spa project, the objective was to deliver three high-quality interior views and curated lobby space renderings that accurately translates design intent and supports confident decision-making.
“Bringing creative thoughts into a vision is a skill not all can master, but I have been grateful for their expertise.” — Tracey Freeman
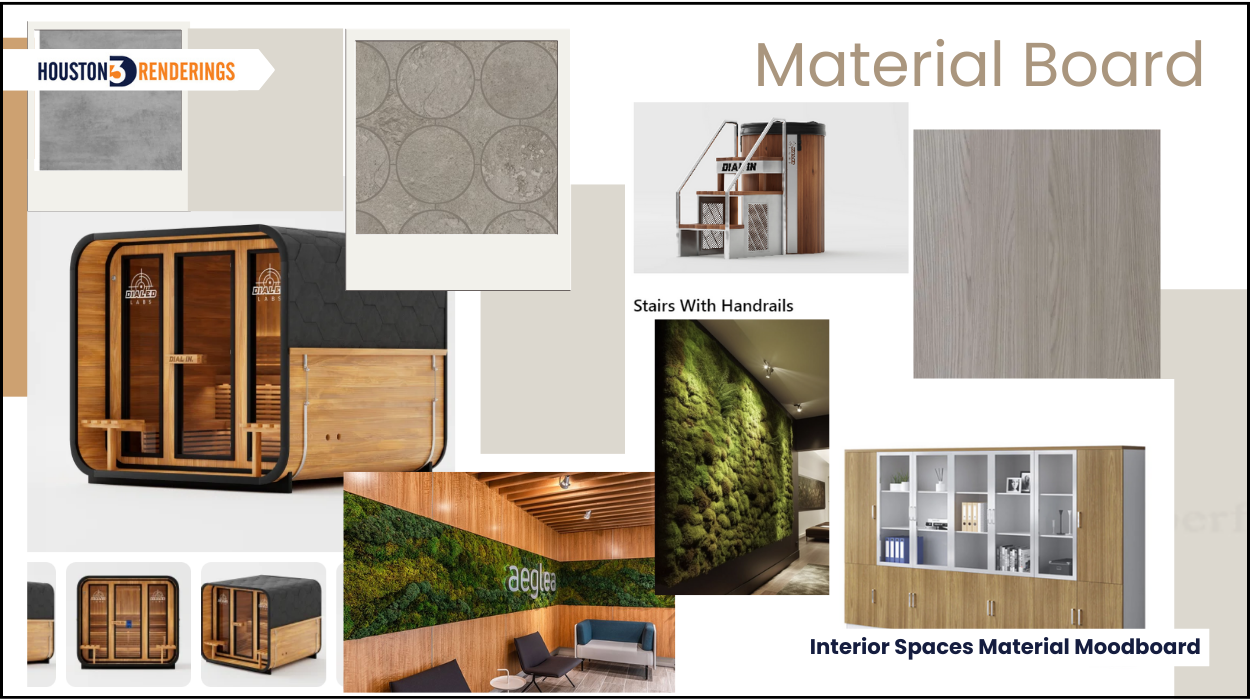
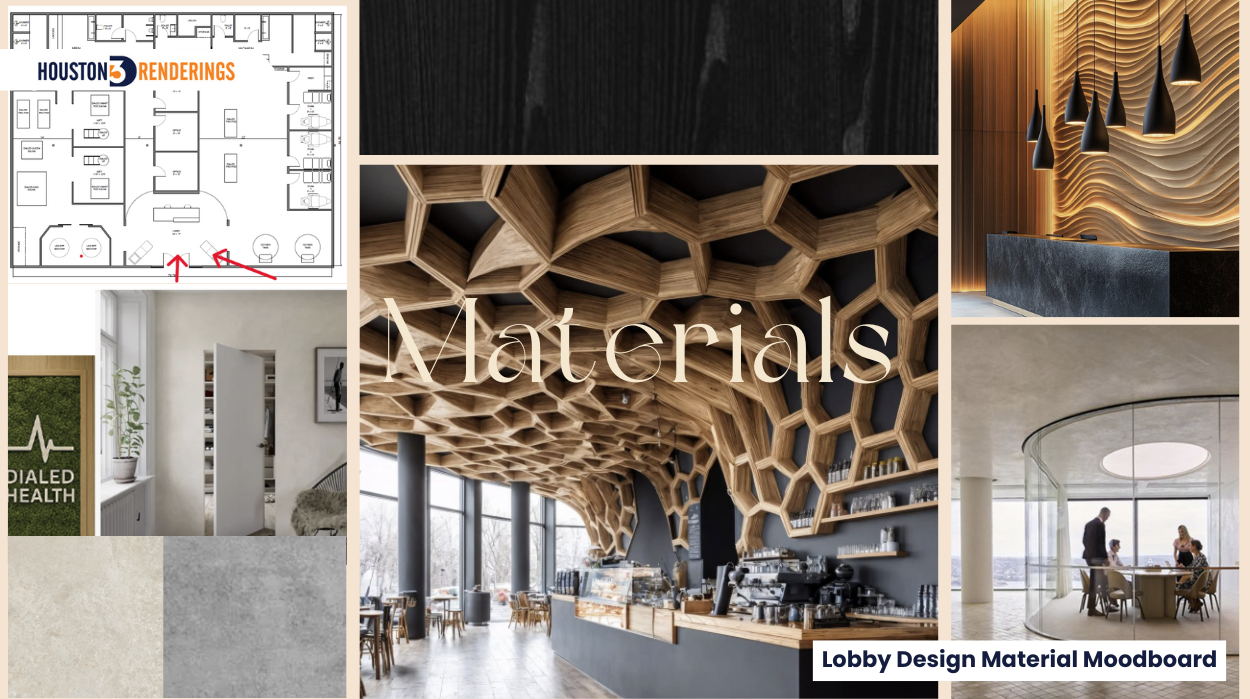
Before producing the final interior 3D renderings, a detailed material mood board was created to align design intent, aesthetics, and functionality across the entire spa environment. This step was critical in ensuring that every surface, from walls and ceilings to flooring and glazing, worked together as a unified visual story.
Rather than reviewing materials in isolation, the mood board allowed the client to see how textures, colors, and finishes interact in real space, making design decisions faster and far more confident.
Key materials and elements visualized included:
With the material language clearly established, individual room renderings could be developed with accuracy and purpose.
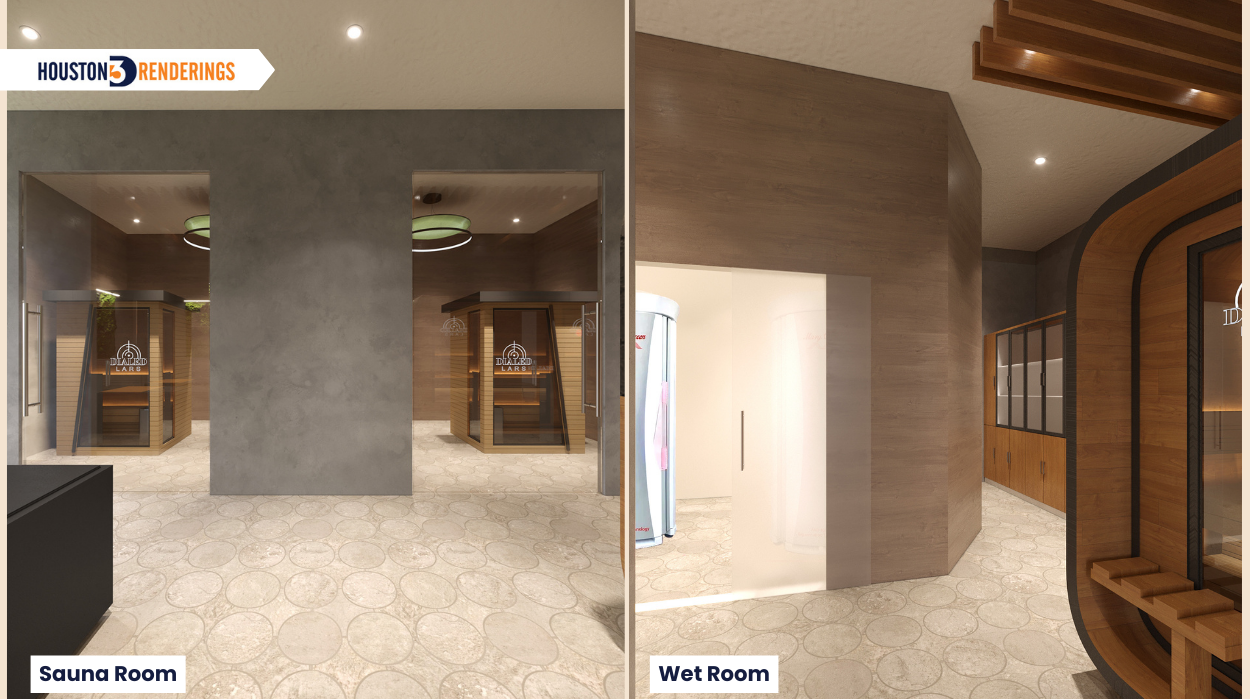
The sauna and wet room interior renderings were developed to show how materials transition seamlessly between connected spa environments. Carefully selected view angles captured the long primary walls, while incorporating flooring and ceiling elements to fully communicate scale, depth, and finish interaction.
These renderings highlighted:
A focal point of the wet room was the long feature wall, inspired by client reference imagery. The wall was framed using Cleaf Ares Laminated Panels and filled with preserved moss greenery, arranged in varied textures for a natural, organic look. When materials are seen together — in context — decisions become faster and more confident.
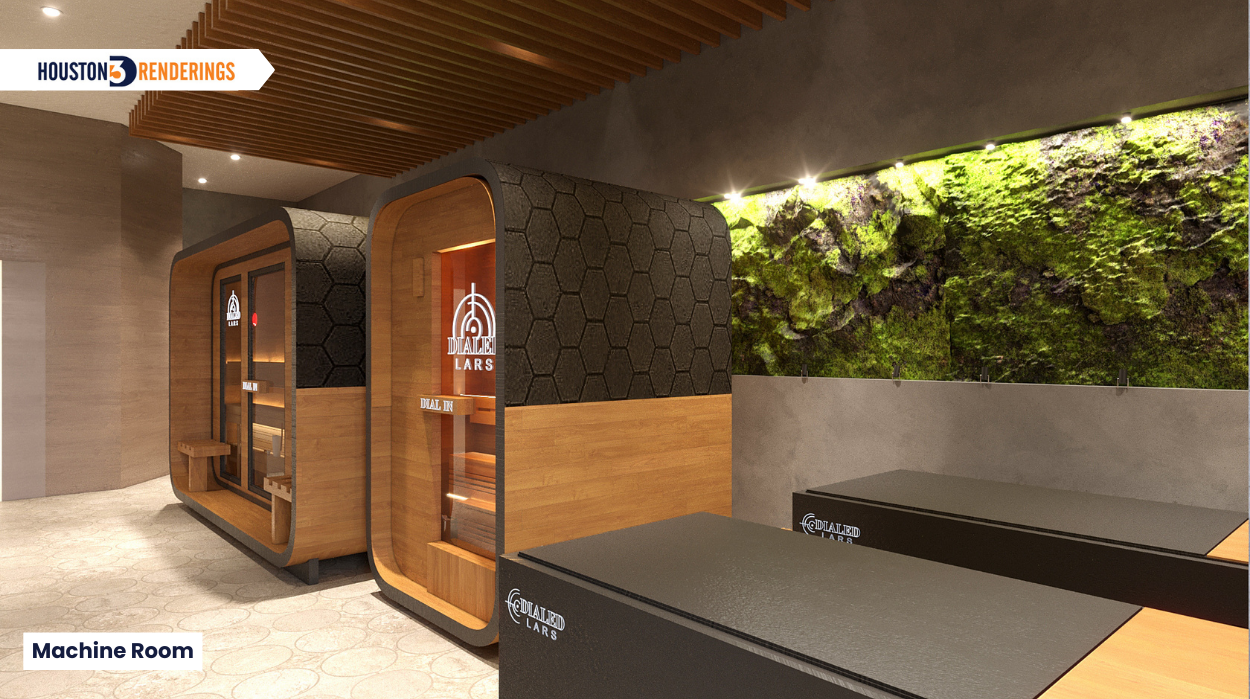
While highly functional, the machine room still required a polished and cohesive visual approach. This interior 3D rendering translated technical requirements into a space that felt organized, intentional, and aligned with the overall spa design language.
The rendering showcased:
Even in utility-focused spaces, the photorealistic rendering ensured clarity, alignment, and confidence for everyone involved.
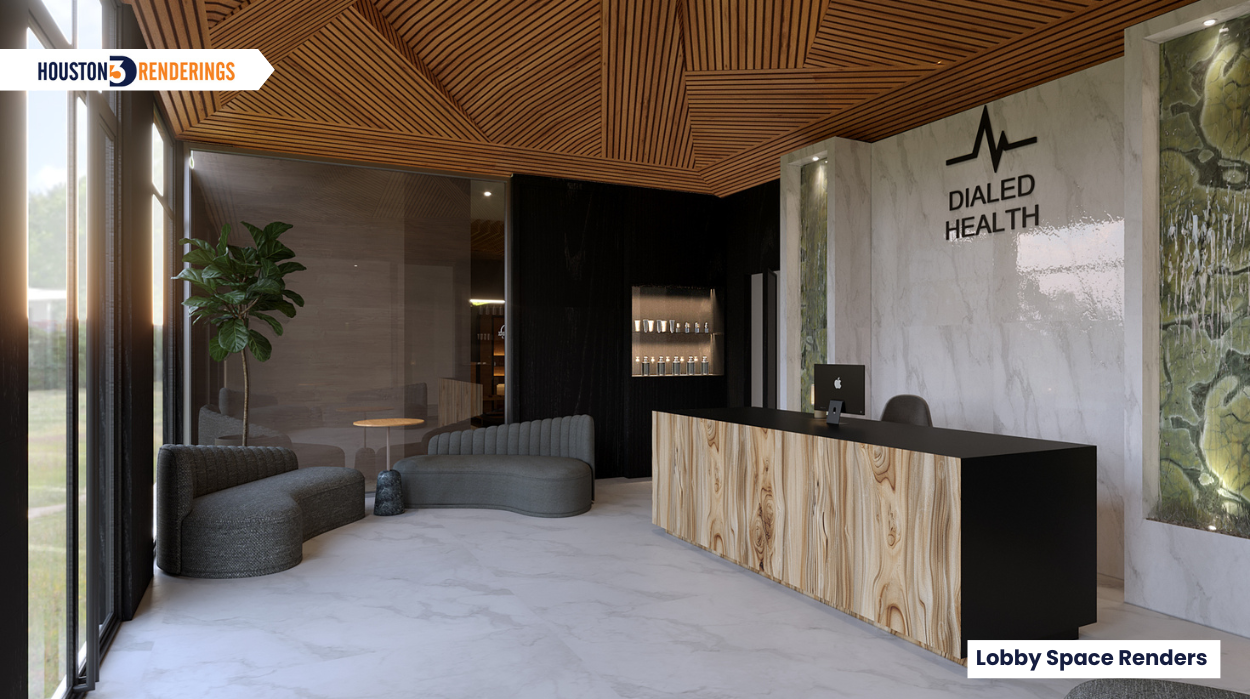
The lobby design focused on creating a welcoming yet elevated arrival experience, one that immediately communicates quality, calm, and modern sophistication. Before developing the final interior 3D renderings, a curated lobby mood board was assembled to define material hierarchy, geometry, and visual flow from the entry inward.
The goal was to refine an earlier lobby rendering by correcting exterior context, rebalancing architectural elements, and elevating material selections to better reflect the client’s expectations.
Lobby materials and design elements visualized included:
This mood board allowed the client to see how form, material, and light come together — before finalizing viewpoints.
To fully communicate the lobby experience, two interior 3D rendering scenes were developed, each highlighting a different function of the space while maintaining a consistent material and architectural language.
The first lobby rendering focuses on the guest arrival and waiting experience, showcasing the seating zone framed by curved geometry and a statement ceiling feature. This view was designed to immediately convey comfort, openness, and visual sophistication.
Key elements highlighted in this scene include:
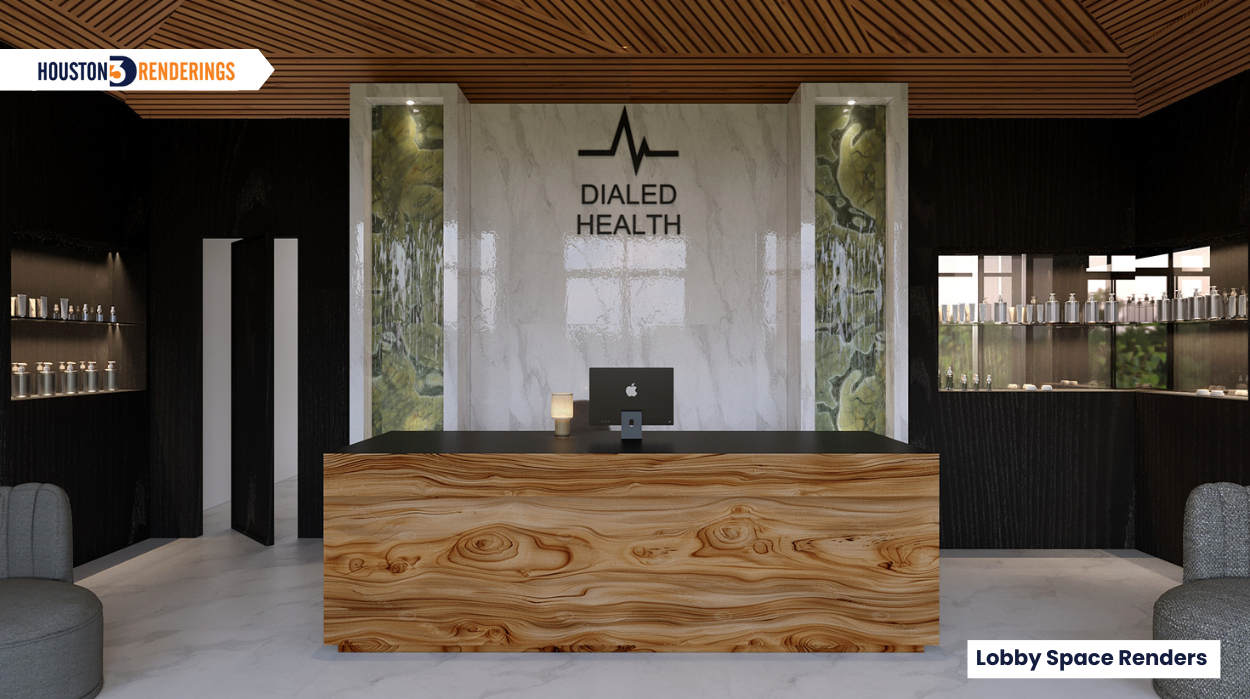
The second lobby rendering shifts focus to the reception and service zone, where material contrast and branding take center stage. This view was developed to highlight how form, texture, and function come together behind the reception desk.
Design features visualized in this scene include:
This scene allows the client to evaluate scale, branding visibility, and material impact — ensuring the reception area feels polished, welcoming, and functional. When the front desk feels resolved, the entire space feels intentional.
Each rendering serves a purpose:
Together, these renderings transform complex design discussions into clear, actionable decisions. Interiors leave no room for uncertainty. Photorealistic 3D renderings show the full picture before construction begins, so decisions are made with confidence and every finish feels intentional.
At www.Houston3DRenderings.com, designers gain clarity where it matters most: before costly revisions or misalignments occur. When the vision is clear, the build — and the client approval process — follows naturally.